Atezr Rotary Attachment Lightburn Parameters
I love the ATEZR KR ROTARY ROLLER for benchtop laser engravers. It works great on my Atezr P10 laser engraver. However, the instructions for using it with Lightburn are…. terrible. It only has a single 2 inch pixelated picture of Lightburn, with all the parameters way too pixelated to read. So here are the parameters needed to use the Atezr Rotary Attachment with Lightburn.

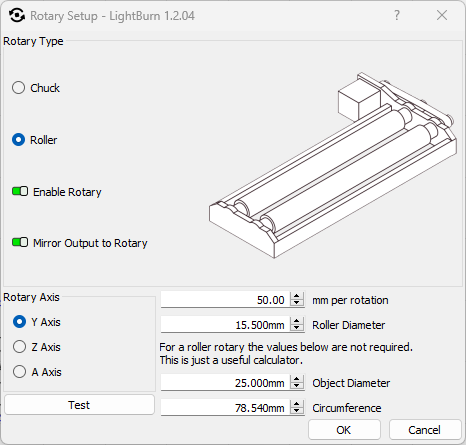
When inside of Lightburn, click the “Rotary Setup” button. Then enter the following Parameters:
- Roller rotary type
- Enable Rotary – Checked
- Mirror Output to Rotary – Checked
- Rotary Axis – Y Axis
- 50.00 mm per rotation
- 15.5 mm Roller Diameter
The 15.5 mm roller diameter was determined simply by measuring the drive roller with a pair of calipers. The 50.00 mm per rotation was found by trial and error. I put a piece of tape on the top of the roller, and clicked “Test” to have lightburn try and rotate it once. 50.00mm was the distance to achieve that single rotation.
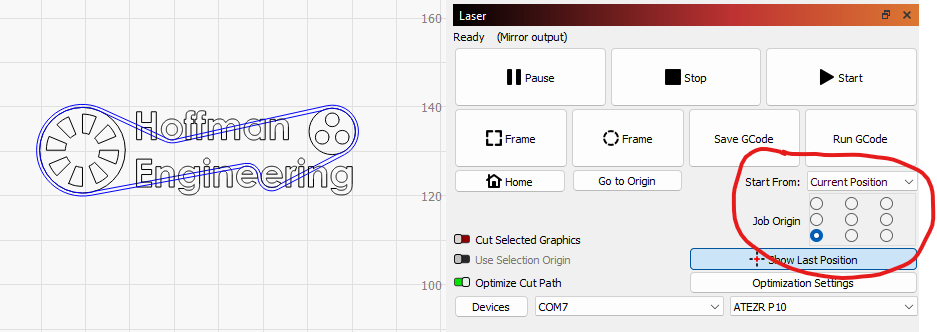
Homing the laser does not work, now that the y-axis does not move when the rotary attachment is connected. So when sending gcode, you need to tell lightburn to start from the Current Position, rather than absolution position.

Now that the Start From is correct, you can place your item on the roller, move the x-axis to the appropriate spot you selected on the Job Origin, and Lightburn will begin engraving from that point.
Hope this was all the information you needed to configure Lightburn for Atezr Rotary Attachment for laser cutters and engravers.


I engraved DAN on a tumbler and wanted it to be horizontal but it came out verticle. what did I miss? All my settings were as yours are.
You might just need to rotate your design in lightburn by 90 degrees. You can think of the top or bottom of the tumbler to be on left or right side of the grid, if that helps you visualize it. If it came out vertical instead of horizontal, just rotate the design 90 degrees.
Suuuuuper grateful for your time and explanation! THANKS!